imixs-cloud
How to Setup the Imixs-Cloud
The following section describes the setup procedure of Imixs-Cloud for small and medium organizations. This setup guide shows how to install a kubernetes cluster into a productive environment consisting of several Internet nodes. Detailed help can be found on the official Kubernetes documentation.
This Setup Guide is currently based on Debian 12 and Kubernetes 1.29.5.
If you just want to upgrade your existing Imixs-Cloud environment jump to the upgrade section below. In the Maintenance section you will find useful information how to maintain a running Imixs-Cloud cluster environment.
You can find also more details about how to create a cluster also on the official Kubernets documentation.
The Cluster Nodes
A Imixs-Cloud consists of a minimum of two nodes.
- The master node is the kubernetes api server
- The worker nodes are serving the applications (pods).
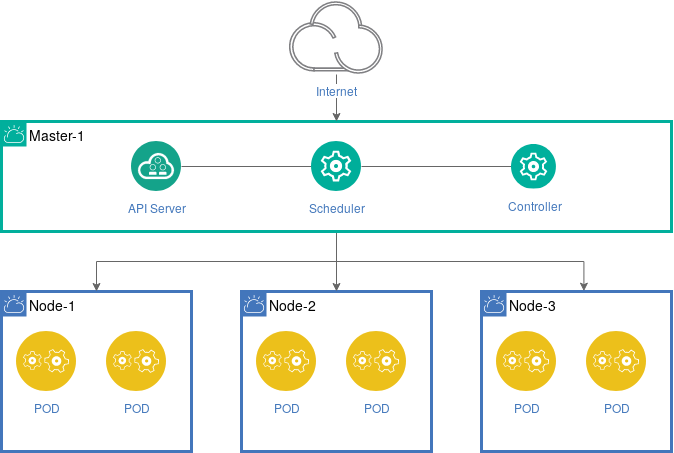
A node can be run on a virtual or on bare metal. All nodes are defined by unique fixed IP-addresses and DNS names. Only the manager-node need to be accessible through the Internet. So you also can connect your worker nodes with a private network if you like.
Cloudname, Hostname and FQDN
To access our servers from the Internet as internally Linux distinguish between the system hostname (short name without a domain) and the fully-qualified domain name (FQDN) in the format hostname.domainname
Kubernetes knows different node types e.g. master nodes and worker nodes. It is recommended that your hostname should reflect this in the nodename. Also it is recommended to have a short name for your cloud that should be also part of the hostname. This makes it more clear when working on a node directly or checking different log files.
The FQDN than looks like this:
nodename.cloudname.domainname
To set this names in /etc/hosts set the FQDN as the first column for the server’s IP, followed by the short name.
$ cat /etc/hosts:
127.0.0.1    localhost
127.0.1.1    nodename.cloudname.domainname nodename-cloudname
10.0.0.1     kube-load-balancer
Note: To enable communication between your cluster nodes using short names, make sure that on each node the short host names are listed in the /etc/hosts with the public or private IP addresses. We also set a IP for the kube-load-balancer here. This IP can be used later for setting up a HA-Cluster. If you don’t have multiple master nodes than place here the IP of your hostname.
The hostname is stored in /etc/hostname
$ cat /etc/hostname:
hostname-cloudname
This concept allows you to login form outside via the FQDN
$ ssh imixs@nodename.cloud.domainname
and you also see the node and cloudname on your login promt:
Last login: Sat Nov 19 07:26:26 2022 from 93.104.191.28
imixs@nodename-cloud ~ $
Public IP Addresses
If you are using public IP Addresses as mentioned in the architecture overview read the section Firewall.
The Cluster-User
Note: In Imixs-Cloud you should always work with a non-root, sudo privileged cluster user. This protects yourself from doing nasty things with the root user. So first make sure that you have defined a cluster-user on your master node and also on all your worker nodes.
To create a cluster-user follow the next steps and replace ‘{username}’ with the name of our cluster user you have chosen.
$ useradd -m {username} -s /bin/bash
$ passwd {username}
Make sure that your cluster-user has also sudo rights!
$ usermod -aG sudo {username}
Install the Master Node
Imixs-Cloud provides a install script for Debain and Fedora/CentOS linux distributions. You can copy the setup script from the /scritps/ directory. But we recommend to clone the Imixs-Cloud git repo so you have all scripts and configuration files in one place. You can also fork the Imixs-Cloud project to customize your environment individually to your needs.
Install Git
For a easy setup install git on your master node and clone the Imixs-Cloud repository or a fork:
For Debian 12 run:
$ sudo apt install -y git
For CentOS 7 run: $ sudo yum install -y git
Next you can clone the repo or your personal fork of Imixs-Cloud ….
$ cd
$ git clone https://github.com/imixs/imixs-cloud.git
Imixs-Cloud is now installed in your home directory:
~/imixs-cloud/
Find more details about how to fork or clone this repo here.
The Setup Script
In order to ensure that all nodes are running the same software releases run the Imixs-Cloud setup script on all your nodes. The script installs the following tools:
- cri-o (the container runtime)
- kubelet (the kubernetes node agent)
- kubeadm (the kubernetes cluster tool)
- kubectl (the kubernetes command line interface)
The install script can be found in the script directory /scripts/. The install script is available for Debian/Ubuntu and Fedora/CentOS. Run the setup script as sudo:
For Debian 12
$ sudo ~/imixs-cloud/scripts/setup_debian_bookworm.sh
For Debian 11
$ sudo ~/imixs-cloud/scripts/setup_debian_bullseye.sh
Note: The setup script for centos is outdated. Please join this project to update it!
Setup the Cluster
After you have installed the setup script and checked your network IP addresses, you can start to initialize your new Kubernetes cluster.
We use a config file to make the cluster setup as easy and flexible as possible. You can edit the config file scripts/setup.yaml before, if you want to change some of the default settings (see details below). You can find details about the uses of a setup.yaml file here.
To start the setup run:
$ sudo kubeadm init --config=scripts/setup.yaml
You will see a detailed protocol showing what happens behind the scene. The last output form the protocol shows you how to setup kubectl and the join token needed to setup worker nodes.
Setup kubectl
kubectl is the commandline tool of kubernetes. We use kubectl to administration Imixs-Cloud and to create, update or delete resources and applications into the cluster.
To make kubectl work for your non-root user, run these commands on your master node. (These commands are also part of the kubeadm init output):
$ mkdir -p $HOME/.kube
$ sudo cp -i /etc/kubernetes/admin.conf $HOME/.kube/config
$ sudo chown $(id -u):$(id -g) $HOME/.kube/config
This will copy the configuration of your master node into the kubernetes config directory ./kube of your home directory. Now you can administrate your kubernetes cluster as a non-root user.
Setup a Cluster Network Interface (CNI)
Before you start to setup your first worker node you need to install a kubernetes cluster network. There are several network plugins available like Calico or Flannel. You will find a complete list here.
Note: In Imixs-Cloud we use the Calico Network interface.
The Calico Network
Calico is an open source networking and network security solution for containers, virtual machines, and native host-based workloads. It is more flexible and powerful than the flannel network and is the recommended solution for Imixs-Cloud.
To install calico download the calico.yaml file from here.
$ curl https://docs.projectcalico.org/manifests/calico.yaml -O -L
If you have defined a CIDR network than you can optional uncomment the environment variable ‘CALICO_IPV4POOL_CIDR’ and set your CIDR network here. But this step should not be required if you followed the setup guide here.
To deploy the network run:
$ kubectl apply -f calico.yaml
After some seconds the cluster should be up and running. You can check the status with:
$ kubectl cluster-info
Find more details about how to install calico here.
Customize Setup
By editing the scripts/setup.yaml before you run the kubeadm init command, you can customize various settings for your new cluster.
You will find a detailed description of all available API settings here.
clusterName
Uncomment the clusterName to give your cluster a custom name. This makes it more easy to identify your cluster when working with different clusters.
clusterName: "[YOUR-CLUSTER-NAME]"
kubernetesVersion
Uncomment the kubernetesVersion if you want to install a specific kubernetes version. Otherwise the latest version will be installed.
kubernetesVersion: "v1.28.3"
advertiseAddress
Uncomment the localAPIPoint, if your master node is using multiple network adapters and you want to bind the node to a specific endpoint. Normally kubeadmn detects the correct address by itself.
localAPIEndpoint:
  advertiseAddress: "[NODE_IP]"
  bindPort: 6443
networking
The podSubnet is the subnet used by Pods. You can change the default podSubnet 10.244.0.0/16 if this network collides with an existing network.
controlPlaneEndpoint
If you have plans to upgrade the cluster to high availability, you can specify the controlPlaneEndpoint defining a shared endpoint used by all control-plane nodes. Such an endpoint should be a DNS name, so you can change the endpoint later easily.
controlPlaneEndpoint: "LOAD-BALANCER-DN"
serverTLSBootstrap
By default the kubelet serving certificate deployed by kubeadm is self-signed. This means a connection from external services like the metrics-server to a kubelet cannot be secured with TLS. To configure the kubelets in a new kubeadm cluster to obtain properly signed serving certificates you can uncomment the KubeletConfiguration option serverTLSBootstrap.
serverTLSBootstrap: true
This will enable the bootstrap of kubelet serving certificates by requesting them from the certificates.k8s.io API. The CSRs (Certificate Signing Requests) for these certificates cannot be automatically approved by the default signer in the kube-controller-manager and will require that you approve the CSRs manually:
Get a list of all Pending CSRs:
$ kubectl get csr
NAME        AGE     SIGNERNAME                        REQUESTOR                      CONDITION
csr-9wvgt   112s    kubernetes.io/kubelet-serving     system:node:worker-1           Pending
csr-lz97v   1m58s   kubernetes.io/kubelet-serving     system:node:control-plane-1    Pending
To approve them call for each CSR the following command:
$ kubectl certificate approve <CSR-name>
Replace
Install Worker Nodes
Now you can run the same script used to install the master node on each of your worker nodes.
$ sudo ~/imixs-cloud/scripts/setup_debian_bookworm.sh
This will install the container runtime and the kubernetes tools.
Adding a Worker Node to your Cluster
To add the new node into your cluster, you need to run the kubeadm join command. This command is a result of the init process performed on your master node. The command expects a token and a certificate hash:
$ sudo kubeadm join xxx.xxx.xxx.xxx:6443 --token xxx.xxxxxxxxx --discovery-token-ca-cert-hash xxxxxxxxxxxxxxxxxxxxxxxxxxxxxx
If you do not know the join command from your cluster, you can run the following command on your master node first:
$ kubeadm token create --print-join-command
After you have added a new worker node the node should appear in your node list:
$ kubectl get nodes
Approve Certificates
If you add a worker node later to your cluster it may happen hat you have to approve certificate-signing-requests (csr) first for the new Node. On the master node run:
$ kubectl get csr
NAME        AGE     SIGNERNAME                        REQUESTOR                      CONDITION
csr-9wvgt   112s    kubernetes.io/kubelet-serving     system:node:worker-5           Pending
....
You need to approve the new certificates first ::
$ kubectl certificate approve <CSR-name>
After that the master node will be able to control the worker node.
Controlling your Cluster From your Workstation
A kubernetes cluster can be administrated remote from your workstation. The tool ‘kubectl’ is the kubernetes command line tool used to manage your cluster via the kubernetes api either from your server or from a workstation.
For security reasons we recommend to run kubectl in smaller environments only from your master-node.
Setup kubectl on Your Workstation
To run kubectl from your workstation you need first to install it. You will find the official install guide here. Note: you install only the kubectl tool, not a full kubernetes server as in the section before.
In order to get kubectl talking to your cluster, you can again copy the content from the administrator kubeconfig file (/etc/kubernetes/admin.conf) into your workstation. (See the section above ‘Setup cubectl on a Server’)
$HOME/.kube/config
Note: The admin.conf file gives the user superuser privileges over the cluster. This file should be used sparingly. For normal users, it’s recommended to generate an unique credential to which you whitelist privileges. Kubernetes supports different authentication strategies. We recommend you to run kubectl only from your master node which gives you more control who access your cluster.
Reset a Node
If something went wrong you can easily roll back everything with the command:
$ sudo kubeadm reset
Note: This will erase the etcd database!
After a reset you should also restart the cri-o runtime:
$ sudo systemctl restart crio
You can also use the scripts/delete_cluster.sh command on the master node to reset the complete master node.
Upgrade
After you have successful installed your Imixs-Cloud cluster you may want to verify its status and maybe update your master and worker nodes. The following guide shows you how to do this. (If you just have installed your new cluster you can skip this section.)
Note: Follow carefully also the official Upgrade Guide.
Verify your Cluster Status
You can verify the status of your kubernets cluster with the following command:
$ kubectl get nodes
NAME              STATUS   ROLES    AGE   VERSION
master-1   Ready    master   28d   v1.28.3
worker-1   Ready    <none>   28d   v1.28.3
worker-2   Ready    <none>   28d   v1.28.3
worker-3   Ready    <none>   28d   v1.28.3
Next you need to upgrade the package repository. Check the current repo version with:
$ pager /etc/apt/sources.list.d/kubernetes.list
NOTE: If you’re not yet using the community-owned package repositories (pkgs.k8s.io), you need to enable the package repository for the desired Kubernetes minor release. This is explained in Changing the Kubernetes package repository document.
Run the following command to upgrade your repo version (replace $KUBE_VERSION with the version to upgrade - e.g. “v1.26”)
$ sudo echo "deb [signed-by=/etc/apt/keyrings/kubernetes-apt-keyring.gpg] https://pkgs.k8s.io/core:/stable:/$KUBE_VERSION/deb/ /" | sudo tee /etc/apt/sources.list.d/kubernetes.list
Check the update with:
$ pager /etc/apt/sources.list.d/kubernetes.list
Upgrade the Master Node
To upgrade the kubeadm tool on the master node first find the latest version
$ sudo apt update
$ sudo apt-cache madison kubeadm
Now you can update your control plane node
$ sudo apt-mark unhold kubeadm && sudo apt-get install -y kubeadm && sudo apt-mark hold kubeadm
Next your can verify the update:
$ sudo kubeadm version
With the following command you can than upgrade your cluster . The command fetches the versions you can upgrade to. It also shows a table with the component config version states.
$ sudo kubeadm upgrade plan
To start an upgrade run:
$ sudo kubeadm upgrade apply v1.27.x
After following the upgrade command you can finally upgrade kubelet and kubectl: $ sudo apt-get install -y –allow-change-held-packages kubelet kubectl $ sudo apt-mark hold kubelet kubectl
We do not need to care about the version as we already updated the repo version. Finally reboot the node or restart the kubelet
$ sudo systemctl daemon-reload
$ sudo systemctl restart kubelet
NOTE: It maybe also necessary to update the network plugin clico. See the section “The Calico Network” on this page.
Upgrade the Worker Nodes
On the worker nodes you first need to check the repo sources:
$ pager /etc/apt/sources.list.d/kubernetes.list
you need to update the repo source to the desired version first :
$ sudo echo "deb [signed-by=/etc/apt/keyrings/kubernetes-apt-keyring.gpg] https://pkgs.k8s.io/core:/stable:/$KUBE_VERSION/deb/ /" | sudo tee /etc/apt/sources.list.d/kubernetes.list
replace $KUBE_VERSION with the version to upgrade - e.g. “v1.26”
next update the repo:
$ sudo apt update
Now you can check which versions are available:
$ sudo apt-cache madison kubeadm
and upgrade the kubeadm tool to the latest patch version (the version is now fetched form the kube repo sources which we updated first)version with the version you want to upgrade to.
$ sudo apt-mark unhold kubeadm && sudo apt-get install -y kubeadm && sudo apt-mark hold kubeadm
Next upgrade the local kubelet configuration:
$ sudo kubeadm upgrade node
Next your can verify the update:
$ sudo kubeadm version
To upgrade kubelet and kubectl run: $ sudo apt-get install -y –allow-change-held-packages kubelet kubectl
Finally reboot the node or restart the kubelet
$ sudo systemctl daemon-reload
$ sudo systemctl restart kubelet
Upgrade cri-o Container Runtime
To upgrade the cri-o container runtime follow the official install guide.
Maintenance
The following section contains some maintenance tips for a running environment.
See also the section Monitoring to learn how you can monitor your cluster and its metrics with a modern dashboard.
Upgrade Expired TLS Certificates
Kubernetes uses PKI certificates for all internal communication between its components (API server, kubelet, etcd, etc.). These certificates expire typically after one year. When that happens, you can no longer communicate with or control the cluster and you may be faced with an error message similar to this:
[authentication.go:64] Unable to authenticate the request due to an error:
[x509: certificate has expired or is not yet valid, x509: certificate has expired or is not yet valid
See also here: https://kubernetes.io/docs/tasks/administer-cluster/kubeadm/kubeadm-certs/
You can verify this situation with kubectl get csr :
$ kubectl get csr
NAME        AGE     SIGNERNAME                        REQUESTOR                      CONDITION
csr-9wvgt   112s    kubernetes.io/kubelet-serving     system:node:worker-1           Pending
csr-lz97v   1m58s   kubernetes.io/kubelet-serving     system:node:control-plane-1    Pending
If the kubelet client certificates on the worker nodes become invalid, the API server will no longer trust the worker nodes. This can lead to issues with pod scheduling or retrieving logs. However, the situation does not cause a complete blockage, so applications will generally continue to run.
To renew the certificates, you must:
- Renew the master certificates:
kubeadm certs renew all - Restart the control plane: API server, controller manager, scheduler
- Update the kubelet configuration on the worker nodes with new bootstrap certificates
The script k8s-cert-renewal.sh can be used to automate this process. The script performs the following steps:
- Renews all master certificates
kubeadm certs renew allkubeadm init phase kubeconfig all - Restarts the control plane (manifest method)
mv manifests → /tmp → move them back - For each worker:
- Creates a new kubelet.conf with admin privileges
- Deletes old, expired certificates
- Configures kubelet for bootstrap
- Restarts kubelet → automatic certificate generation
- Automatically approves all Certificate Signing Requests (CSRs)
kubectl certificate approve - Verifies cluster status
The script can be executed on the master node. It will then prompt for SSH logins to each worker node. The entire process takes approximately 5–10 minutes:
$ sudo ./scripts/k8s-cert-renewal.sh
Rescale a Node
To rescale a node first mark the node as unschedulable:
$ kubectl drain node-x
next you can shutdown the node, upgrade or rescale the node. After the node is up again run uncordon to join the node again the scheduler.
$ kubectl uncordon node-x
Remove a Node
In order to remove a node form the cluster you can first call:
$ kubectl drain <node name>
This will safely evict all pods from a node before you perform maintenance on the node (e.g. kernel upgrade, hardware maintenance, etc.). Safe evictions allow the pod’s containers to gracefully terminate and will respect the PodDisruptionBudgets you have specified.
To bring the node back into the cluster run:
$ kubectl uncordon node-x
To delete the node from the cluster:
$ kubectl delete node <node-name>
Finally connect to the specific worker node an run:
# ATTENTION: MAKE SURE YOU ARE ON THE NODE TO BE REMOVED!!!
$ sudo kubeadm reset